Looking for a dessert that’s rich, creamy, and truly decadent? You've found it! My Silky No-Bake Espresso Chocolate Tart is simple to make and perfect for any occasion. Packed with bold flavors and a buttery crust, this tart will impress friends and family alike. Follow my easy guide, and you'll create a showstopper that tastes even better than it looks. Ready to dive into this delicious treat? Let’s get started!
Why I Love This Recipe
- Decadent Flavor: This tart combines rich dark chocolate with the boldness of espresso, creating a luxurious dessert that's perfect for chocolate lovers.
- No-Bake Convenience: With no baking required, this recipe is quick and easy, making it ideal for warm days or last-minute gatherings.
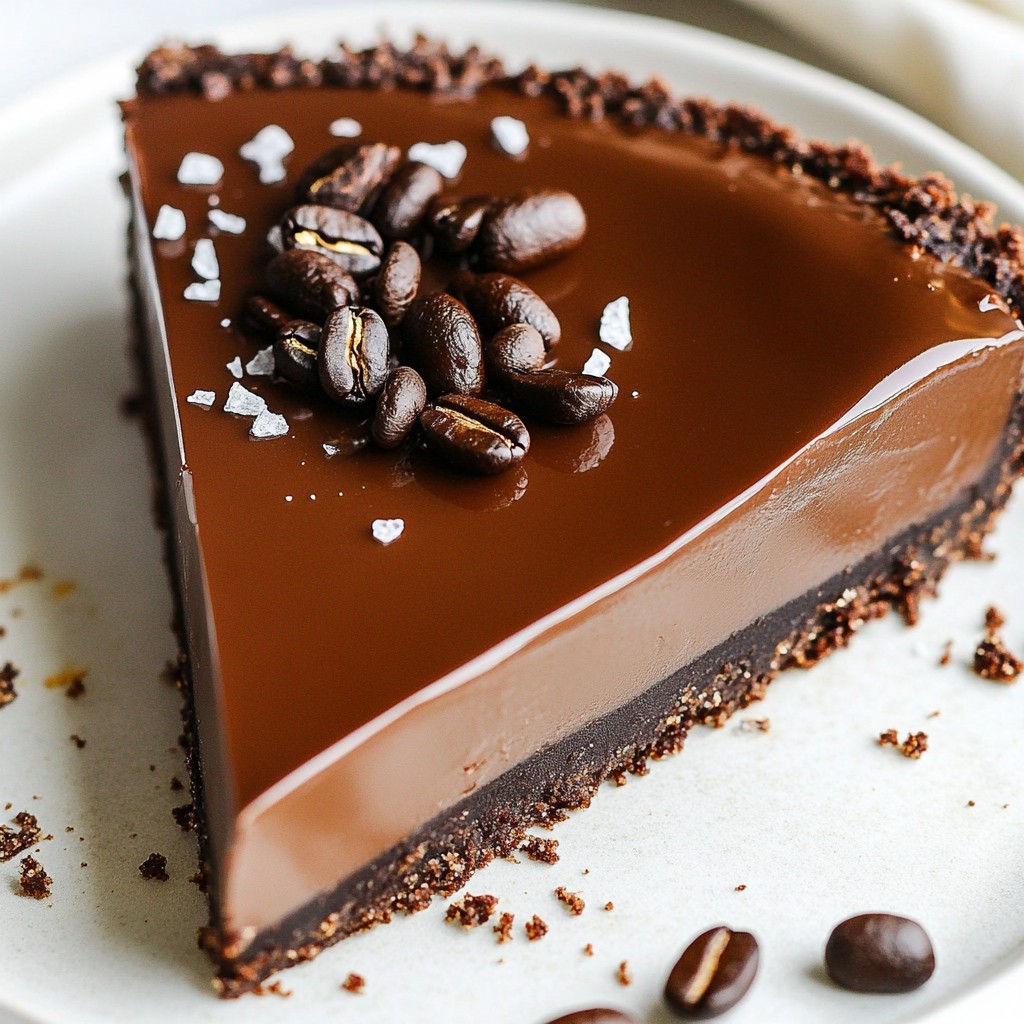
- Elegant Presentation: The chocolate shavings and coffee beans on top provide a beautiful and sophisticated touch, making it a showstopper for any occasion.
- Versatile Dessert: This tart can be customized by adding your favorite toppings or serving it with ice cream, allowing for endless variations.
Ingredients
Detailed Ingredient List
To make the Silky No-Bake Espresso Chocolate Tart, gather these items:
- 1 ½ cups chocolate cookie crumbs
- ½ cup unsalted butter, melted
- 1 cup dark chocolate (70% cocoa), chopped
- 1 cup heavy cream
- ¼ cup powdered sugar
- 2 tablespoons espresso powder
- 1 teaspoon vanilla extract
- ¼ teaspoon sea salt
- Chocolate shavings and coffee beans for garnish
These ingredients create a rich, smooth tart that will impress anyone.
Substitutions for Ingredients
You may want to swap some ingredients. Here are a few ideas:
- For chocolate cookie crumbs, use graham cracker crumbs or Oreos.
- If you don't have unsalted butter, salted butter works too; just skip the sea salt.
- For dark chocolate, semi-sweet chocolate is a good option.
- Instead of heavy cream, use coconut cream for a dairy-free version.
- You can replace espresso powder with instant coffee for a similar flavor.
These swaps keep the essence of the tart while catering to your needs.
Importance of Ingredient Quality
Using high-quality ingredients is key for this tart.
- Chocolate: The chocolate should be at least 70% cocoa. This gives a deep, rich taste.
- Cream: Fresh heavy cream whips better and adds a light texture.
- Espresso Powder: Good espresso powder offers a strong coffee flavor.
Quality ingredients truly elevate the dish, making it taste gourmet. Enjoy your cooking adventure!

Step-by-Step Instructions
Preparing the Crust
To make the crust, start with chocolate cookie crumbs. You need 1 ½ cups of these crumbs. Mix them with ½ cup of melted unsalted butter in a bowl. Use a spatula to combine them well. The crumbs should be fully coated in butter. Next, grab a 9-inch tart pan. Press the cookie mixture firmly into the bottom and up the sides. You can use your fingers or a flat-bottomed cup. Make sure it is even and compact. Once done, place the pan in the fridge. This helps the crust firm up while you make the filling.
Making the Chocolate Filling
For the filling, melt 1 cup of dark chocolate in a double boiler. Stir it gently until it is smooth. Once melted, take it off the heat and let it cool a bit. In another bowl, whip 1 cup of heavy cream. Add ¼ cup of powdered sugar, 2 tablespoons of espresso powder, 1 teaspoon of vanilla extract, and ¼ teaspoon of sea salt. Use an electric mixer to whip until medium peaks form. Slowly fold the melted chocolate into the whipped cream. Do this in three stages. Be gentle, so you do not deflate the cream. Mix until it is just combined, and the filling is silky and smooth.
Assembling the Tart
Now, pour the silky espresso chocolate filling into the prepared crust. Use a spatula to smooth the top. Cover the tart with plastic wrap and chill it in the fridge. Let it set for at least 4 hours. Once it is set, carefully remove the tart from the pan. Place it on a serving platter. For a fancy touch, garnish with chocolate shavings and a few whole coffee beans on top. Enjoy your delicious creation!
Tips & Tricks
How to Achieve the Perfect Crust
To get the best crust, use fresh chocolate cookie crumbs. I like to crush cookies with a food processor for even crumbs. If you don't have one, place cookies in a bag and crush them with a rolling pin. Mix the crumbs with melted butter until they look like wet sand. Press this mixture firmly into the tart pan. Use a flat-bottomed cup to help compact it evenly. Chill the crust in the fridge for at least 30 minutes to set. This helps it hold its shape when you add the filling.
Tips for Whipping Cream Successfully
When you whip cream, start with cold tools. Chill your mixing bowl and beaters in the fridge for 15 minutes. This helps the cream whip quickly. Pour in the heavy cream and add the powdered sugar. Beat on medium speed until you see soft peaks. Be careful not to overwhip, as it will turn grainy. Stop mixing as soon as you see medium peaks. This keeps the cream light and airy. Gently fold in the chocolate to maintain that fluffy texture.
Making Ahead and Serving Suggestions
You can make this tart a day ahead. Just cover it tightly with plastic wrap and store it in the fridge. This allows the flavors to blend well. When you're ready to serve, remove it from the pan gently. Use a sharp knife to slice it neatly. For an extra touch, sprinkle chocolate shavings and coffee beans on top. These add a nice look and taste. Serve it chilled for the best experience.
Pro Tips
- Use Quality Chocolate: The flavor of your tart largely depends on the chocolate you use. Opt for high-quality dark chocolate (70% cocoa or higher) for the best taste and texture.
- Chill Thoroughly: Allow the tart to chill for at least 4 hours or overnight. This helps the filling set perfectly and makes slicing easier.
- Customize Your Coffee Flavor: If you love a stronger coffee taste, increase the espresso powder to suit your preference. Just be cautious not to overpower the chocolate.
- Garnish Creatively: Besides chocolate shavings and coffee beans, consider adding a light dusting of cocoa powder or a swirl of whipped cream for an extra touch of elegance.
Variations
Flavor Variations
You can easily change the flavor of your tart. Try adding different extracts. Almond extract gives a warm, nutty taste. Use orange extract for a bright, citrus twist. You can also swap in flavored coffee for more depth. Consider hazelnut or vanilla coffee for a unique spin. These small changes can make a big difference.
Alternative Topping Ideas
Toppings can elevate your tart. Consider fresh berries like raspberries or strawberries. They add a nice contrast to the rich chocolate. You can also use whipped cream or chocolate sauce. For a crunchy texture, try crushed nuts or a sprinkle of sea salt. These toppings make your tart look pretty and taste even better.
Dietary Adjustments
You can easily adapt this recipe for different diets. For a vegan version, use coconut cream instead of heavy cream. Choose dairy-free chocolate for a rich flavor. To make it gluten-free, use gluten-free cookie crumbs for the crust. These simple swaps allow everyone to enjoy this delicious dessert.
Storage Info
Best Storage Practices
To keep your Silky No-Bake Espresso Chocolate Tart fresh, store it in the fridge. Use an airtight container or cover it well with plastic wrap. This will prevent any unwanted odors from other foods. If you want to keep it for longer, freezing is a great option too.
How Long the Tart Lasts
When stored properly in the fridge, the tart can last for about 3 to 5 days. The flavor and texture will remain great during this time. If you notice any changes in smell or texture, it’s best to throw it away.
Freezing Instructions
To freeze the tart, wrap it tightly in plastic wrap and then in aluminum foil. This will help to keep it safe from freezer burn. You can freeze it for up to 2 months. When ready to eat, move it to the fridge overnight to thaw. Enjoy it cold or let it sit at room temperature for a bit before serving.
FAQs
Can I use milk chocolate instead of dark chocolate?
Yes, you can use milk chocolate. However, it will make the tart sweeter. Milk chocolate has less cocoa than dark chocolate. This might change the flavor and richness. If you want a richer taste, stick with dark chocolate.
How can I make this tart without espresso?
You can skip the espresso if you prefer a milder taste. Try using strong brewed coffee instead. Another option is to use vanilla extract for flavor. This will still give the tart a nice depth without the coffee flavor.
What can I substitute for heavy cream?
You can use coconut cream as a dairy-free option. Another choice is whipped topping for a lighter texture. If you need a lower-fat option, try using half-and-half. Each substitute will change the tart's texture slightly, so keep that in mind.
This post covered key steps to make a delicious tart. We discussed essential ingredients, their quality, and fun substitutions. You learned how to prepare the crust, fill it with chocolate, and assemble it perfectly. We shared tips for a flawless finish and various ways to modify the recipe for your taste. Whether you want to store it or serve it fresh, this guide has you covered. Keep experimenting with flavors and enjoy every bite of your tasty creation.